# Scenario Streaming
# Core Mode
# XPLORA Playback
One way for up-converting IF binary files to RF in order for streaming, is the usage of the XPLORA Playback software in combination with an Ettus front-end. This software enables streaming of samples via a UDP/IP interface to the hardware.
# Prerequisites for Ubuntu 22.04 or later and Debian 12 or later
Add the respective repository and install the needed drivers (more information can be found here (opens new window)):
sudo add-apt-repository ppa:ettusresearch/uhd
sudo apt-get update
sudo apt-get install libuhd4.9.0 uhd-host
Download the newest FPGA images for the Universal Software Radio Peripheral (USRP (opens new window)):
sudo uhd_images_downloader
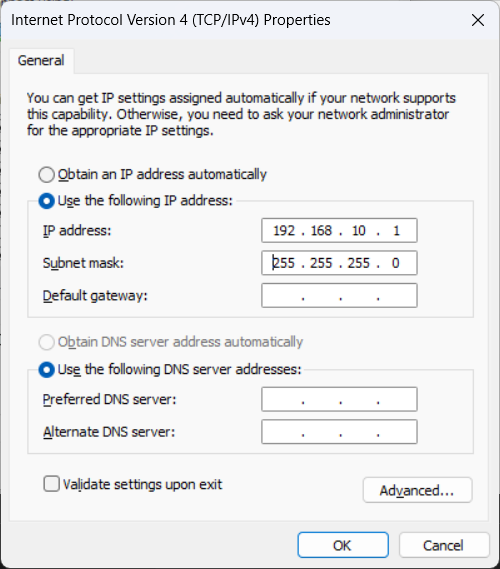
Configure the host computers' network setting the following:
- static IP: 192.168.10.1
- netmask: 255.255.255.0
- gateway: 0.0.0.0
NOTE
It is recommended to create a new wired network connection in order to easily switch back to the default one.
After that, the Ettus device can be directly connected via ethernet to the host computer (P2P) so the device can be found via
uhd_usrp_probe
In case this yields an version error regarding the FPGA images, run:
uhd_image_loader --args="type=usrp2,addr=192.168.10.2,reset"
or alternatively
uhd_image_loader --args="type=x300,addr=192.168.10.2,reset"
If needed, resize the send buffer on the host computer:
sudo sysctl -w net.core.wmem_max=2500000
NOTE
Set the values permanently by editing /etc/sysctl.d/uhd-usrp2.conf and restart the computer.
If needed, allow to change the thread priority for non-root users (more information can be found here (opens new window)):
sudo groupadd usrp
sudo usermod -aG usrp $USER
Then add the line below to end of the file /etc/security/limits.conf:
@usrp - rtprio 99
In order for the settings to take effect, one must log out and back in to the user.
NOTE
The IP address of the Ettus device can be changed to meet the user's local network configuration. This way, no P2P connection is required for usage.
For example, if the default IP address (192.168.10.2) of an Ettus shall be changed to 192.168.1.100, the following commands shall be executed:
N200
/usr/lib/uhd/utils/usrp_burn_mb_eeprom --args="type=usrp2,addr=192.168.10.2" --values="ip-addr=192.168.1.100"
X300
/usr/lib/uhd/utils/usrp_burn_mb_eeprom --args="type=x300,addr=192.168.10.2" --values="ip-addr0=192.168.1.100"
In case of the X300, different Address EEPROM keys can be used to set a corresponding IP address:
| Ethernet Interface | USRP Ethernet Port | Default USRP IP Address | Host Static IP Address | Host Static Subnet Mask | Address EEPROM key |
|---|---|---|---|---|---|
| Gigabit | Port 0 (HG Image) | 192.168.10.2 | 192.168.10.1 | 255.255.255.0 | ip-addr0 |
| Ten Gigabit | Port 0 (XG Image) | 192.168.30.2 | 192.168.30.1 | 255.255.255.0 | ip-addr2 |
| Ten Gigabit | Port 1 (HG/XG Image) | 192.168.40.2 | 192.168.40.1 | 255.255.255.0 | ip-addr3 |
# Prerequisites for Windows 10 or later
Download the latest Windows installer under UHD-Release (opens new window) and install it on your local machine.
NOTE
If the libusb-1.0.dll is missing, please download and copy it to the UHD binary installation directory, e.g. C:\Program Files\UHD\bin.
The newest FPGA images should be located under C:\Program Files\UHD\share\uhd\images.
Configure the host computers' network setting the following:
- Open the Ethernet Properties
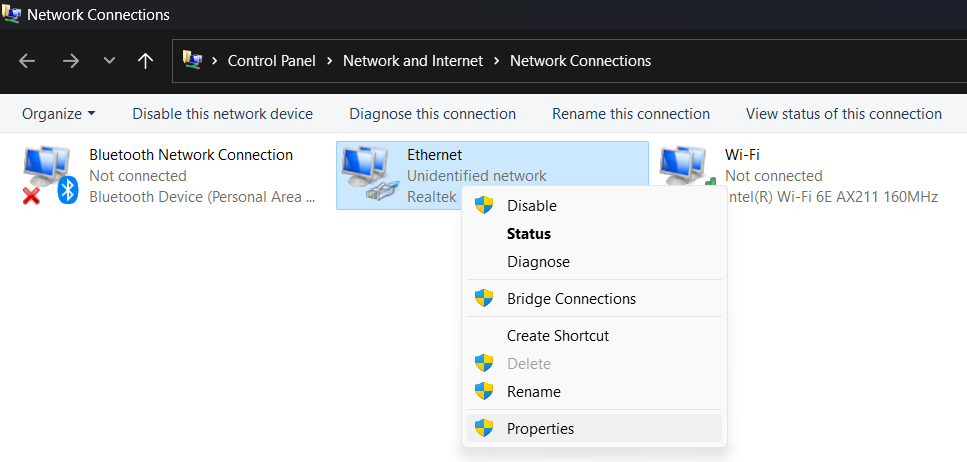
- Select Internet Protocol Version 4 TCP/IPv4 and click on Properties
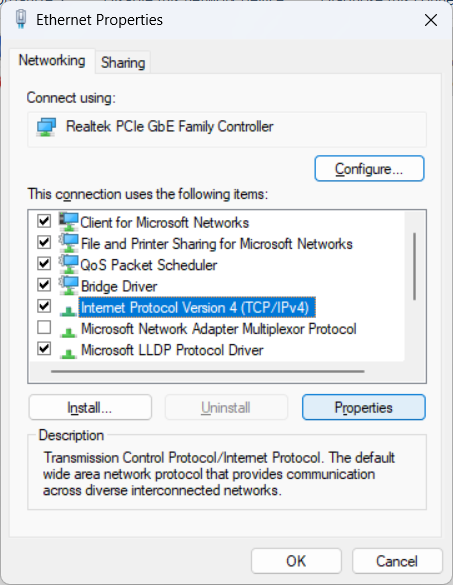
- Make the following adjustments and click on OK
After that, the Ettus device can be directly connected via ethernet to the host computer (P2P) so the device can be found via
uhd_usrp_probe.exe
In case this yields an version error regarding the FPGA images, run:
uhd_image_loader.exe --args="type=usrp2,addr=192.168.10.2,reset"
or alternatively
uhd_image_loader.exe --args="type=x300,addr=192.168.10.2,reset"
# Generating Signals for Playback with Ettus N200
Before simulating a streamable scenario within XPLORA's Core Mode, make sure that the scenario settings meet the Ettus N200 requirements for playback.
| Output Configuration (Quantization) | Output Complex | Supported Sampling Rates |
|---|---|---|
| 8 bits per sample (signed) | True |
|
| 16 bits per sample (signed) | True |
|
# Generating Signals for Playback with Ettus X300
Before simulating a streamable scenario within XPLORA's Core Mode, make sure that the scenario settings meet the Ettus X300 requirements for playback.
| Output Configuration (Quantization) | Output Complex | Supported Sampling Rates |
|---|---|---|
| 8 bits per sample (signed) | True |
|
| 16 bits per sample (signed) | True |
|
NOTE
Take the maximum bandwidth supported by the Ettus device into account when defining the sampling rate and intermediate frequency of the scenario.
# Streaming Signal
After all preparations were successfully conducted, click within the XPLORA toolbar on the button
 XPLORA Playback
to open the Playback software.
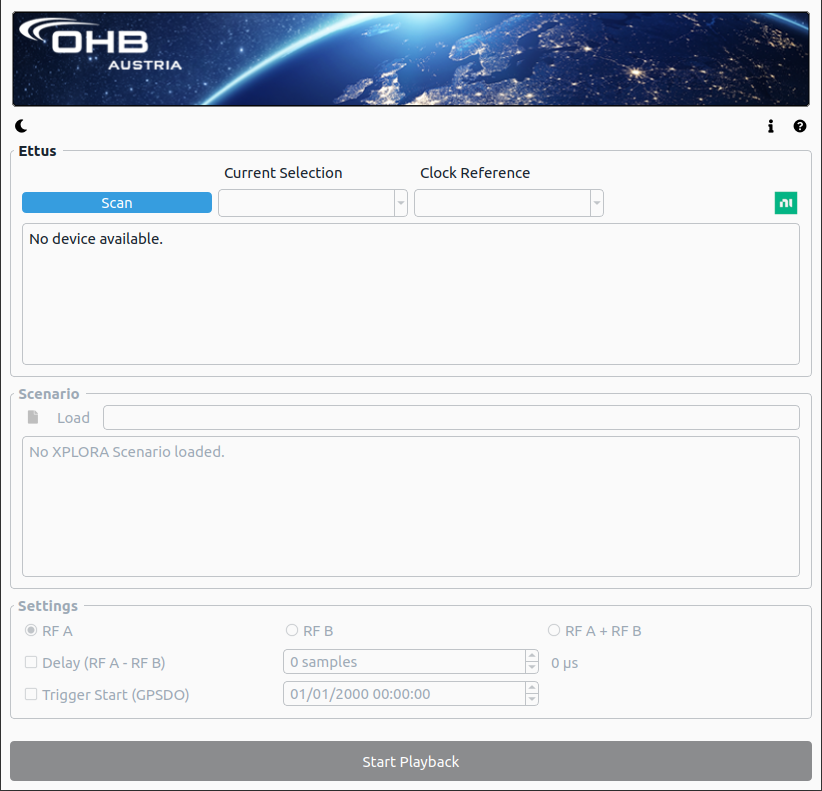
Follow below steps in order to stream simulated binaries on one or two channels with a supported Ettus device.
1) Scan for devices
When clicking the Scan button, one or multiple Ettus devices connected to the host computer/local network will be found and listed (if properly configured). When the desired device is selected, detailed properties are shown to the user within a log view:
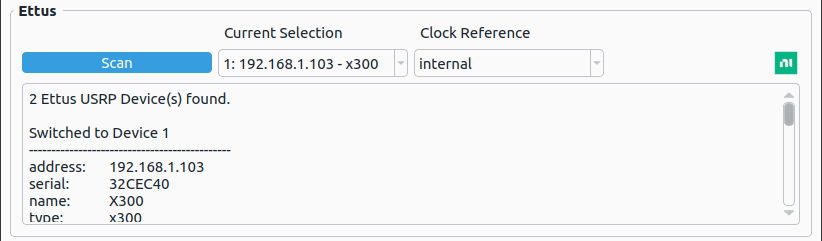
Depending on the connected device, it is possible to choose between different clock/time sources with the following possible options:
- internal - internal oscillator
- *external - external oscillator connected to the REF IN
- mimo - Multiple-Input and Multiple-Output (see MIMO Capability with USRP Devices (opens new window))
- gpsdo - GPS-disciplined oscillator (start of streaming can be time-triggered)
2) Load scenario
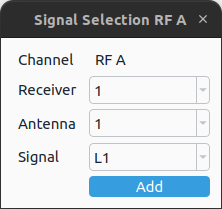
When a device has been selected, the option for loading a scenario becomes available. Load a scenario json file  of an already finished simulation. If the scenario file and simulated data is valid, one/multiple dialogs appear, letting the user assign a binary to each available RF channel:
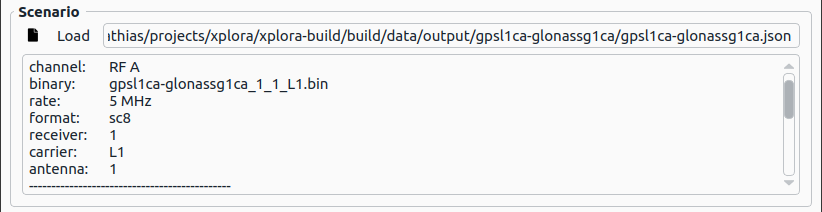
After assigning a binary to each channel, additional information of the scenario simulation is shown to the user within a log view:
3) Start/Stop Playback: After the previous two steps were successful, additional streaming settings become available as well as the option to start the playback by clicking on the Start Playback button.
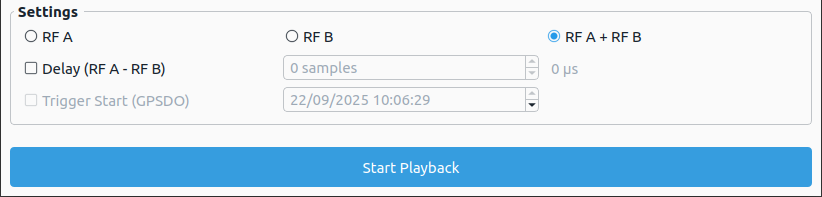
The following settings can be changed before streaming:
- Channel selection: RF A, RF B or RF A + RF B (if available)
- Sample Delay: If RF A + RF B is selected, a streaming delay (in samples) between the two channels can be set (with a maximum possible delay of 1 second)
- Trigger Start: If a GPS-disciplined oscillator is available and selected, this option becomes available. It lets the user trigger the start of the streaming at a certain time in the near future (in case the gpsdo is synced).
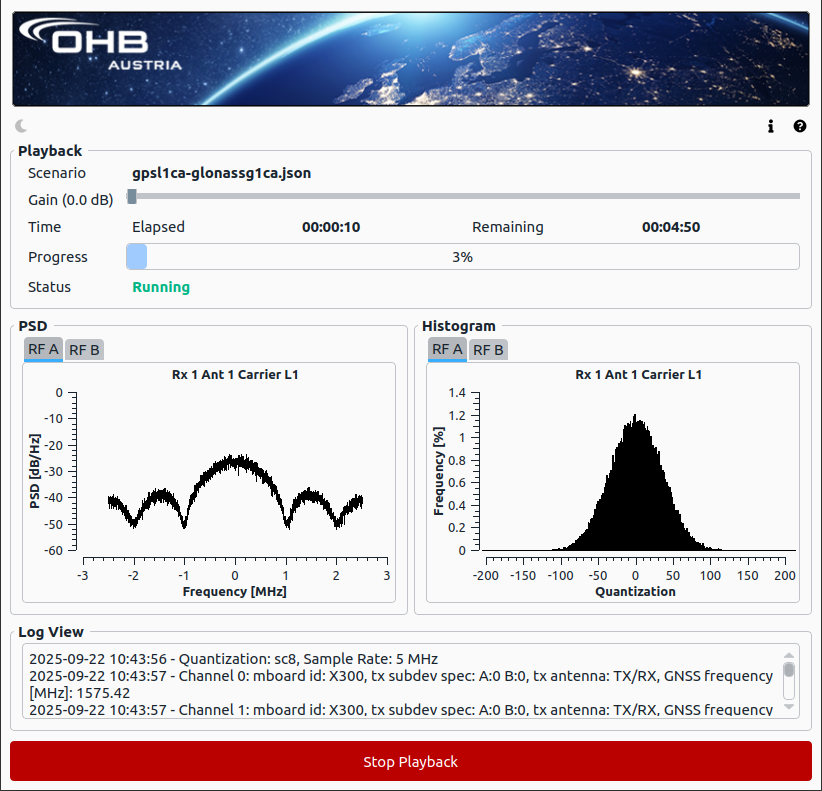
After the streaming has been started, the user interface switches to the streaming view where the current progress and time information is shown. Furthermore, it is possible to adapt the transmit gain via a slider. The signal streaming can be stopped at any time.
A graphical view of the power spectral density as well as the histogram of the streamed samples of each active channel is presented to the user. A log view shows additional meta information during the streaming, letting the user know if any problems/errors occured.
# IZT S1000
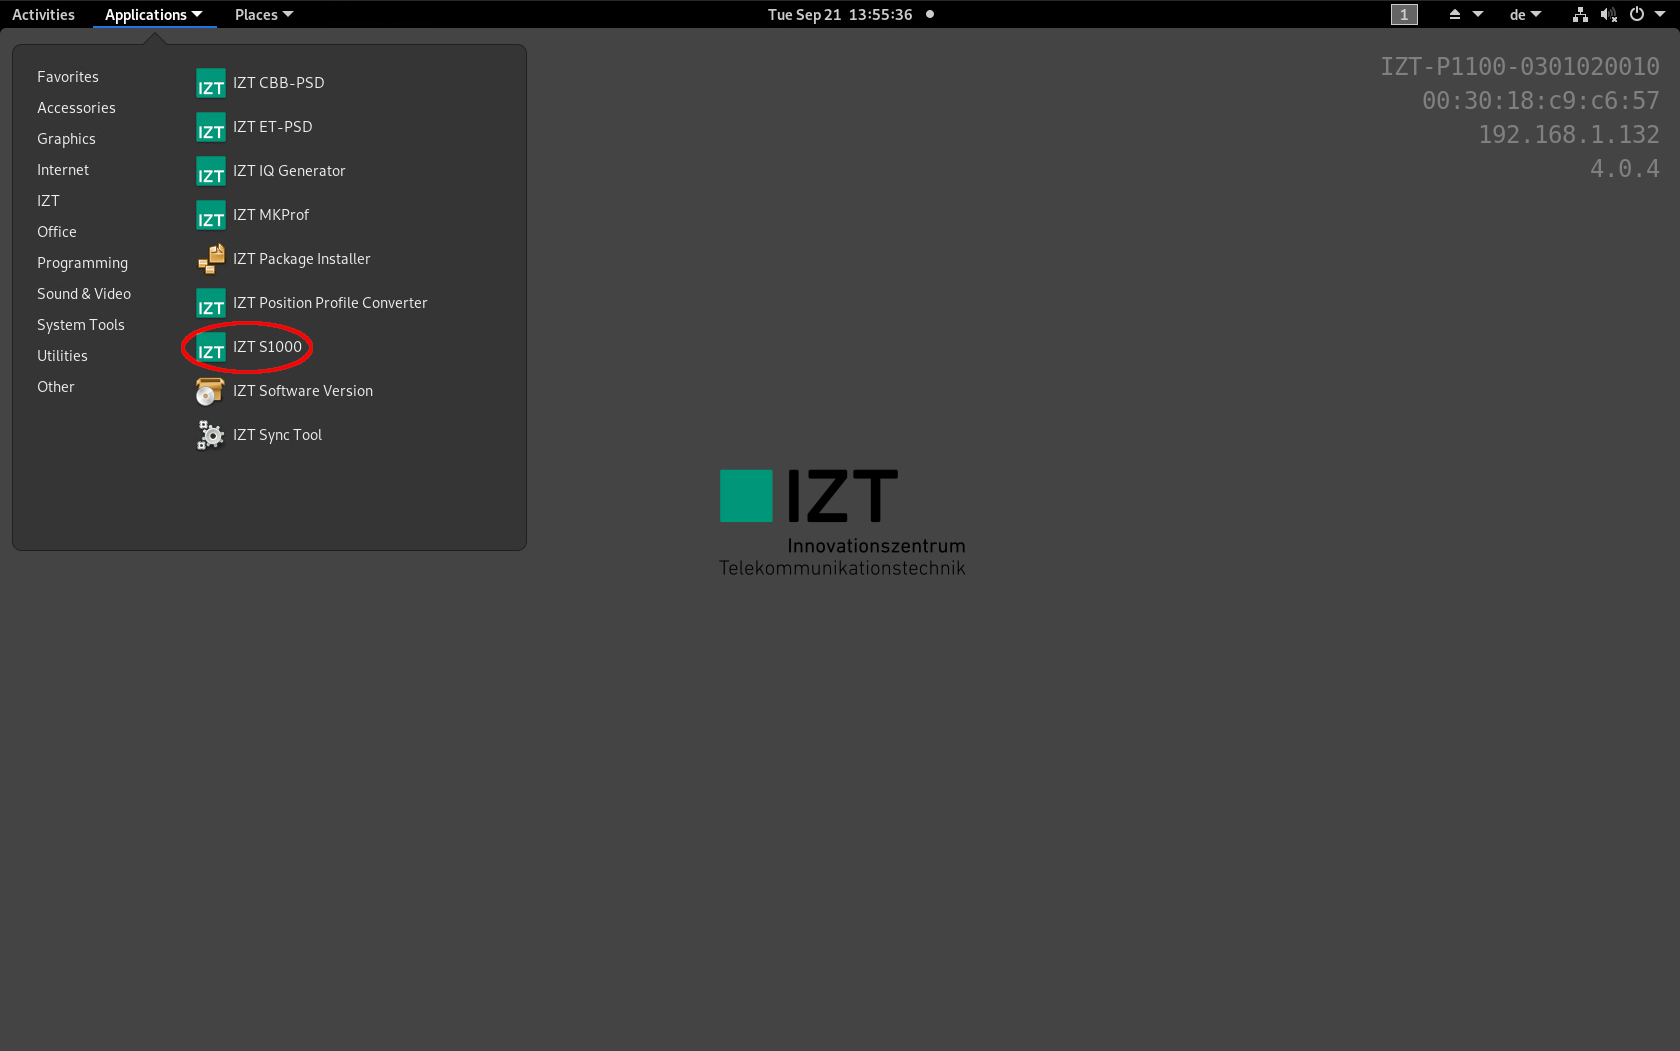
Anothter way to up-convert IF binary files generated with XPLORA to RF and stream it, the IZT S1000 GUI is needed in combination with the IZT S1000/P1100 hardware. After the system has booted up, the program can be found on the P1100 under:
Applications → IZT → IZT S1000.
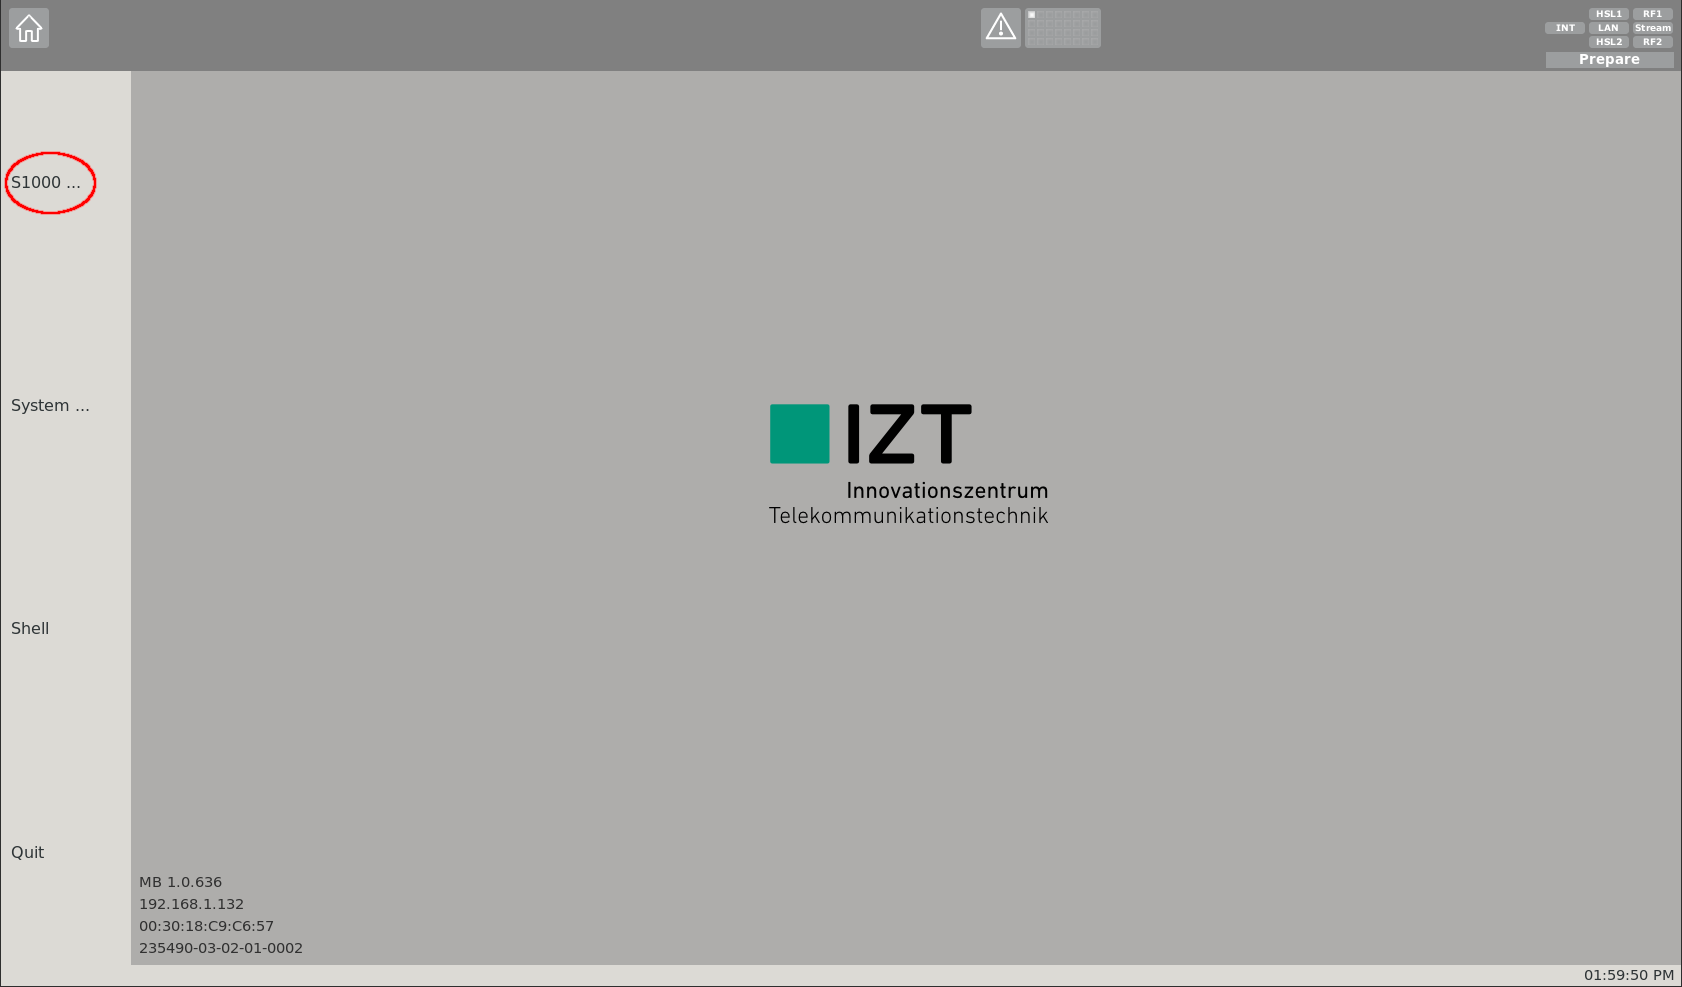
The front page of the GUI offers a variety of options. Within the navigation bar on the left side, different sub-pages can be accessed. For signal streaming, go to the S1000 sub-page by clicking at the S1000 ... section.
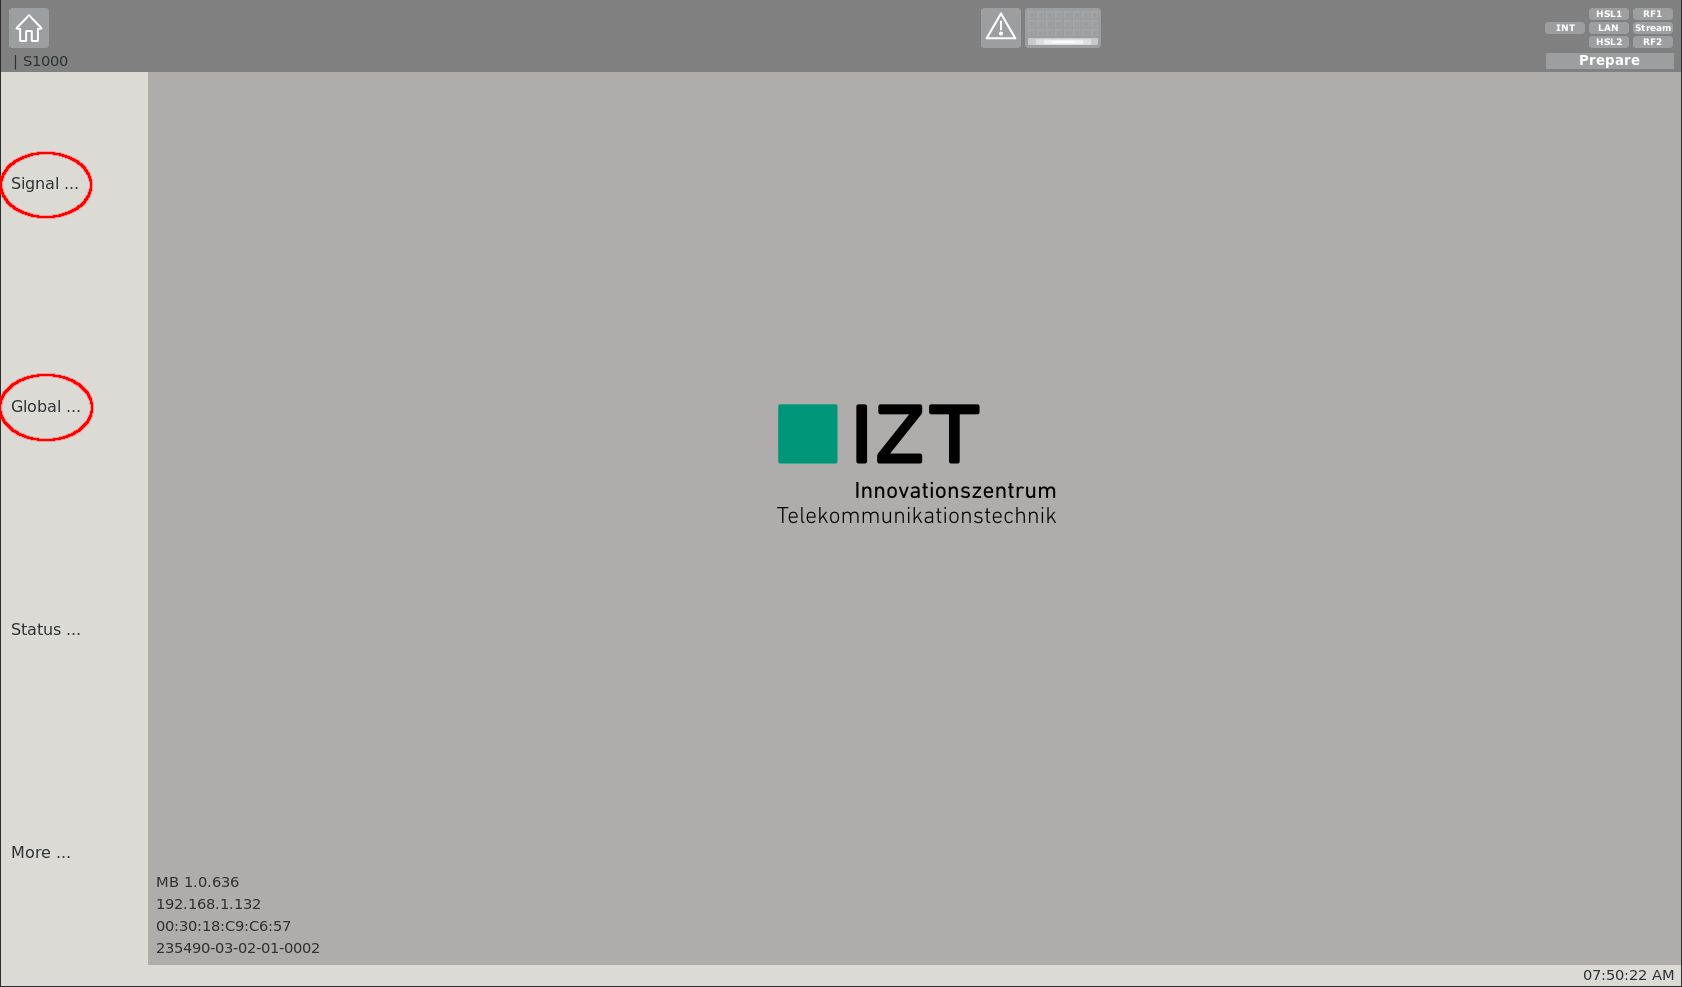
On this sub-page streaming options of the S1000 can be configured. Two sub-pages can be accessed from here:
- Signal: Signal specific settings page
- Global: Global RF settings page
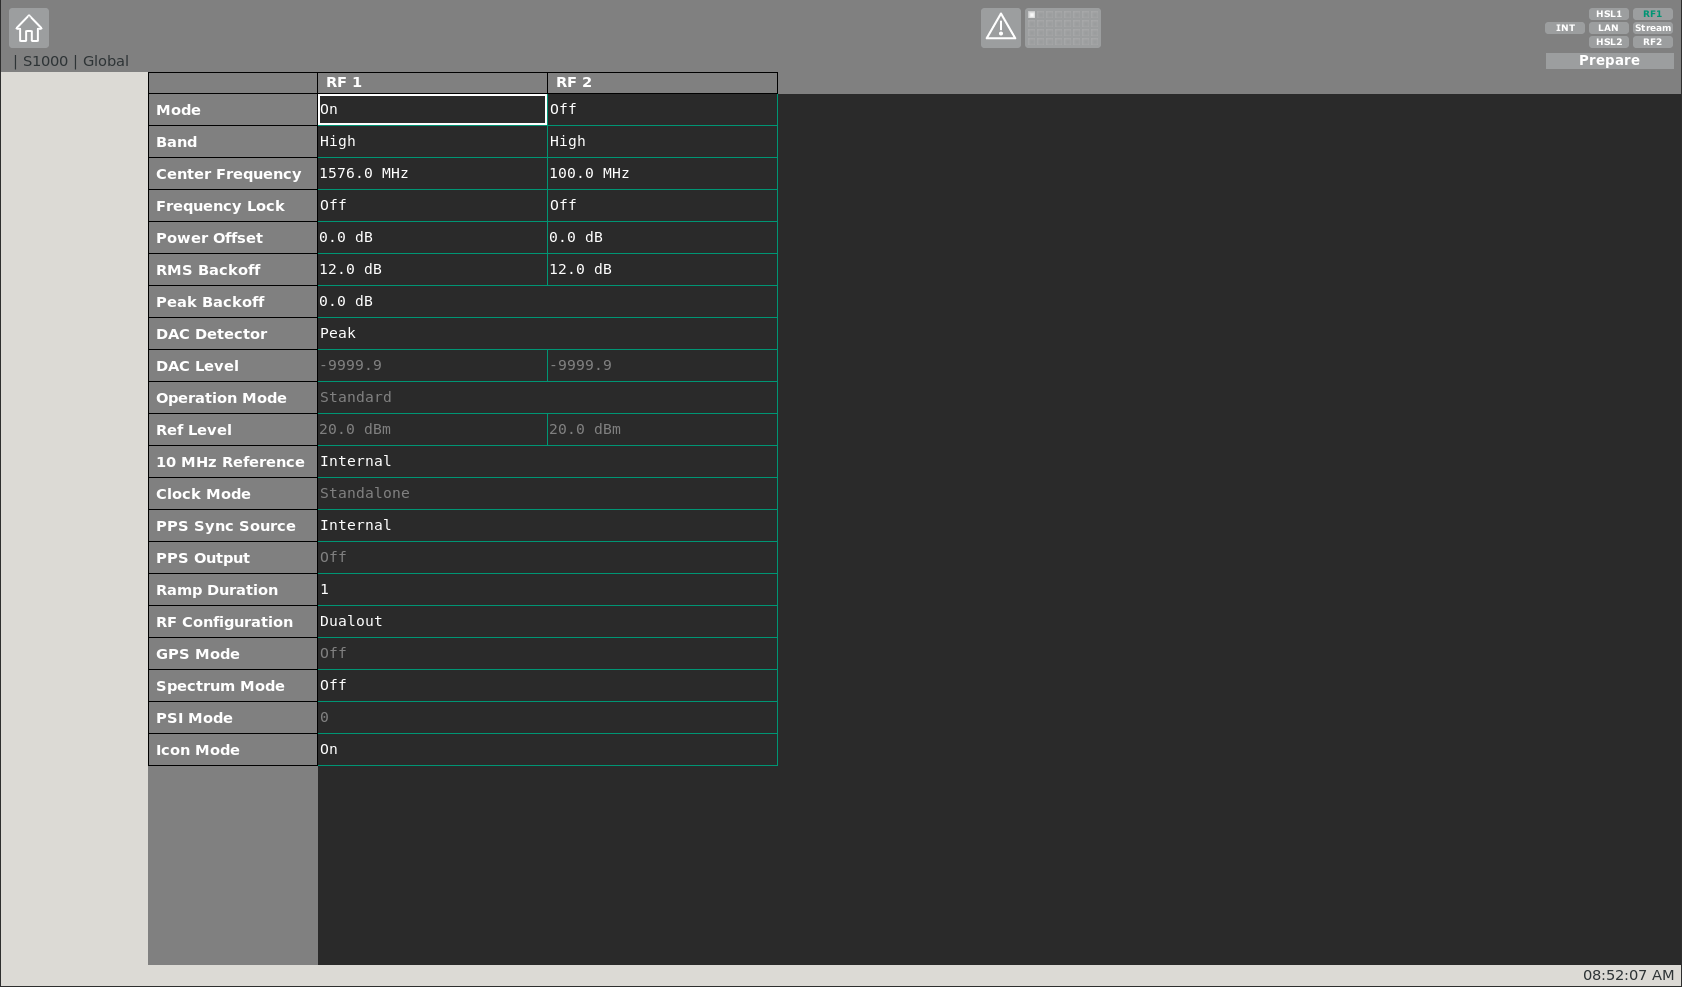
It is recommended to first adapt the global settings by clicking at the Global ... section.
On the global settings sub-page, settings for both physical RF outputs can be adjusted. The most relevant ones are the Mode and Center-Frequency. Via the mode, a certain RF output can be toggled on/off (this can also be done via the toolbar on the top right). Each RF output of the S1000 covers a bandwidth of 120 MHz. The rest of the settings can remain unchanged.
The table Carrier Frequencies lists the most relevant GNSS center frequencies while table GNSS Signal Specifications gives an overview of the specifications of GNSS signals.
The table below shows some useful signal combinations:
| Useful Combinations | Center | Sampling |
|---|---|---|
| L1/E1 + G1 | L1 | ≈ 31 MHz |
| L1/E1 + G1 + B1 | L1 | ≈ 50 MHz |
| L2 + G2 | L2 | ≈ 23 MHz |
| L5/E5a + E5b/B2 + E5 | E5 | ≈ 51 MHz |
After applying the global RF settings, the signal specific settings can be adapted. At this sub-page, i.a. the IF binary file can be selected, which will be up-converted to RF and streamed by the S1000. Up to 32 signals can be defined and de-/activated. An IF file can either be selected from memory or from a harddisk of the P1100.
Since the IF file is generated by XPLORA, it is stored in a defined directory on harddisk of the P1100. Therefore, the settings under the Memory section can be neglected.
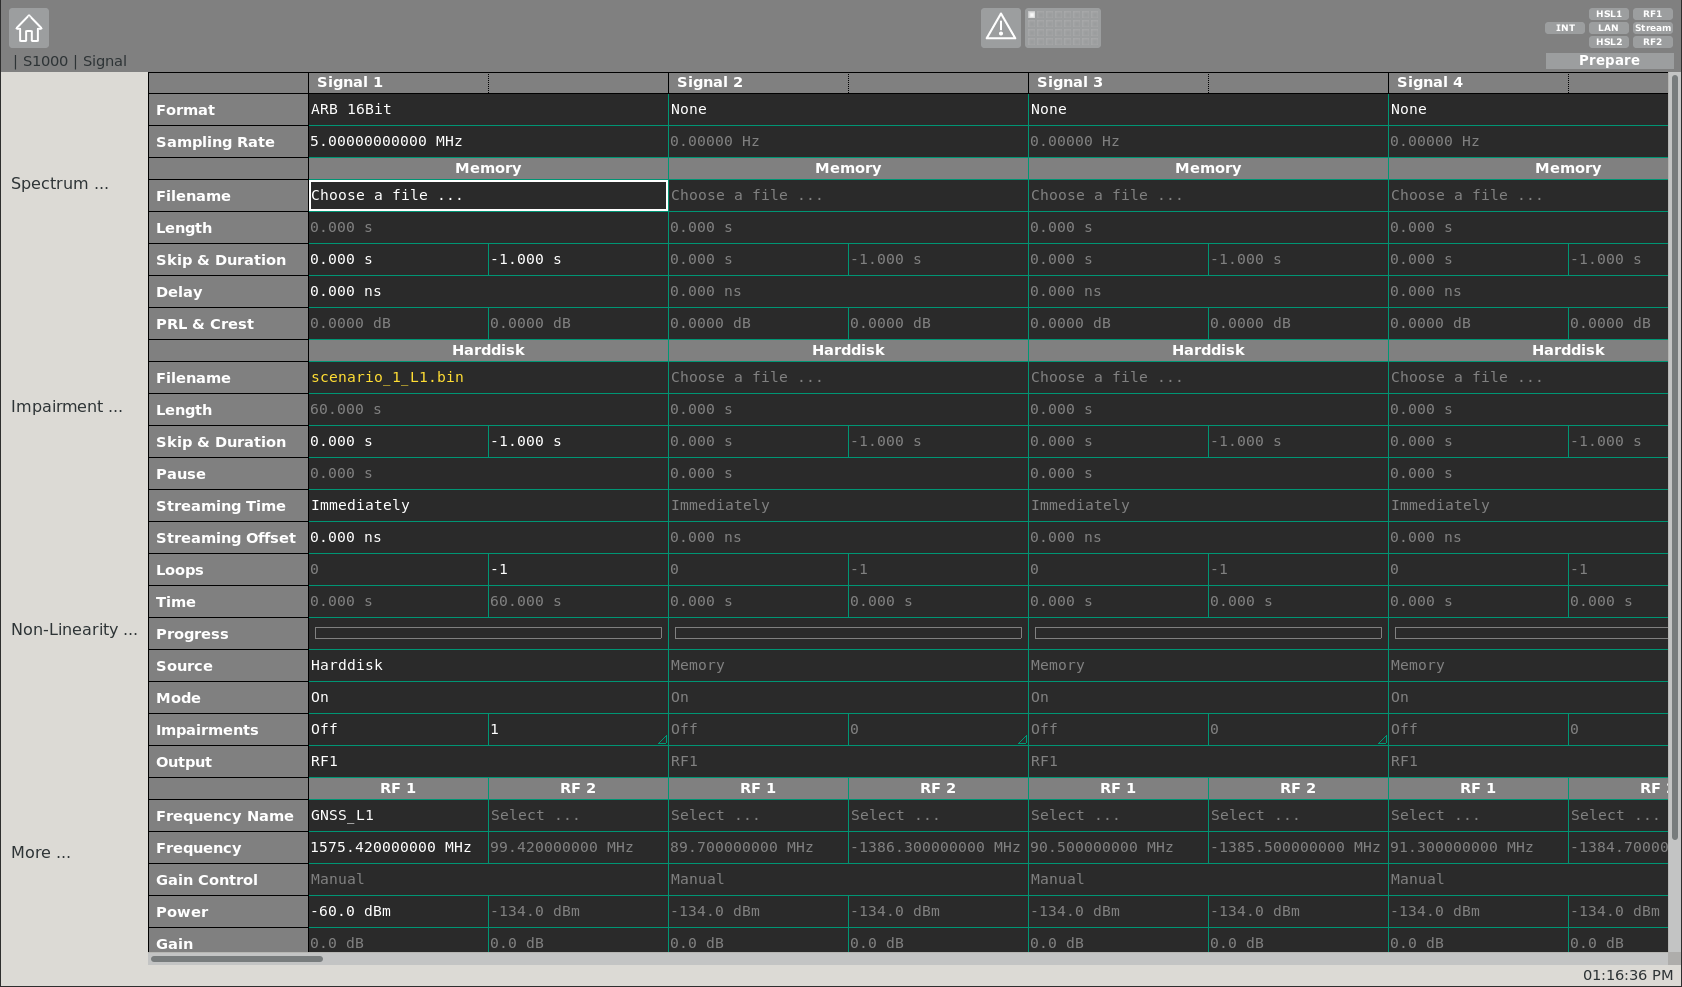
The most relevant signal specific settings are described in the following:
- Format - Specifies the quantization of the selected IF file (16 bit in case of XPLORA)
- Sampling Rate - Specifies the sampling rate of the IF file
- Filename - Specifies the location of the IF file on harddisk
- Skip and Duration - Specifies a desired time-span which shall be skipped at start of the file. Furthermore the duration can be defined (-1 specifies a duration until end of file)
- Streaming Time - Specifies the time, when the streaming shall start
- Source - Specifies the source where the IF file is located (choose Harddisk)
- Mode - Toggle signal on/off
- Output - Specifies the RF output (RF1, RF2, RF1 & RF2)
- Frequency Name - Specifies the center frequency of the generated IF signal by name
- Frequency - Specifies the center frequency of the generated IF signal by value (in case the IF is set to 0 MHz within the XPLORA simulation it equals exactly the nominal center frequency)
- Power - Specifies the power of the signal at RF output in dBm
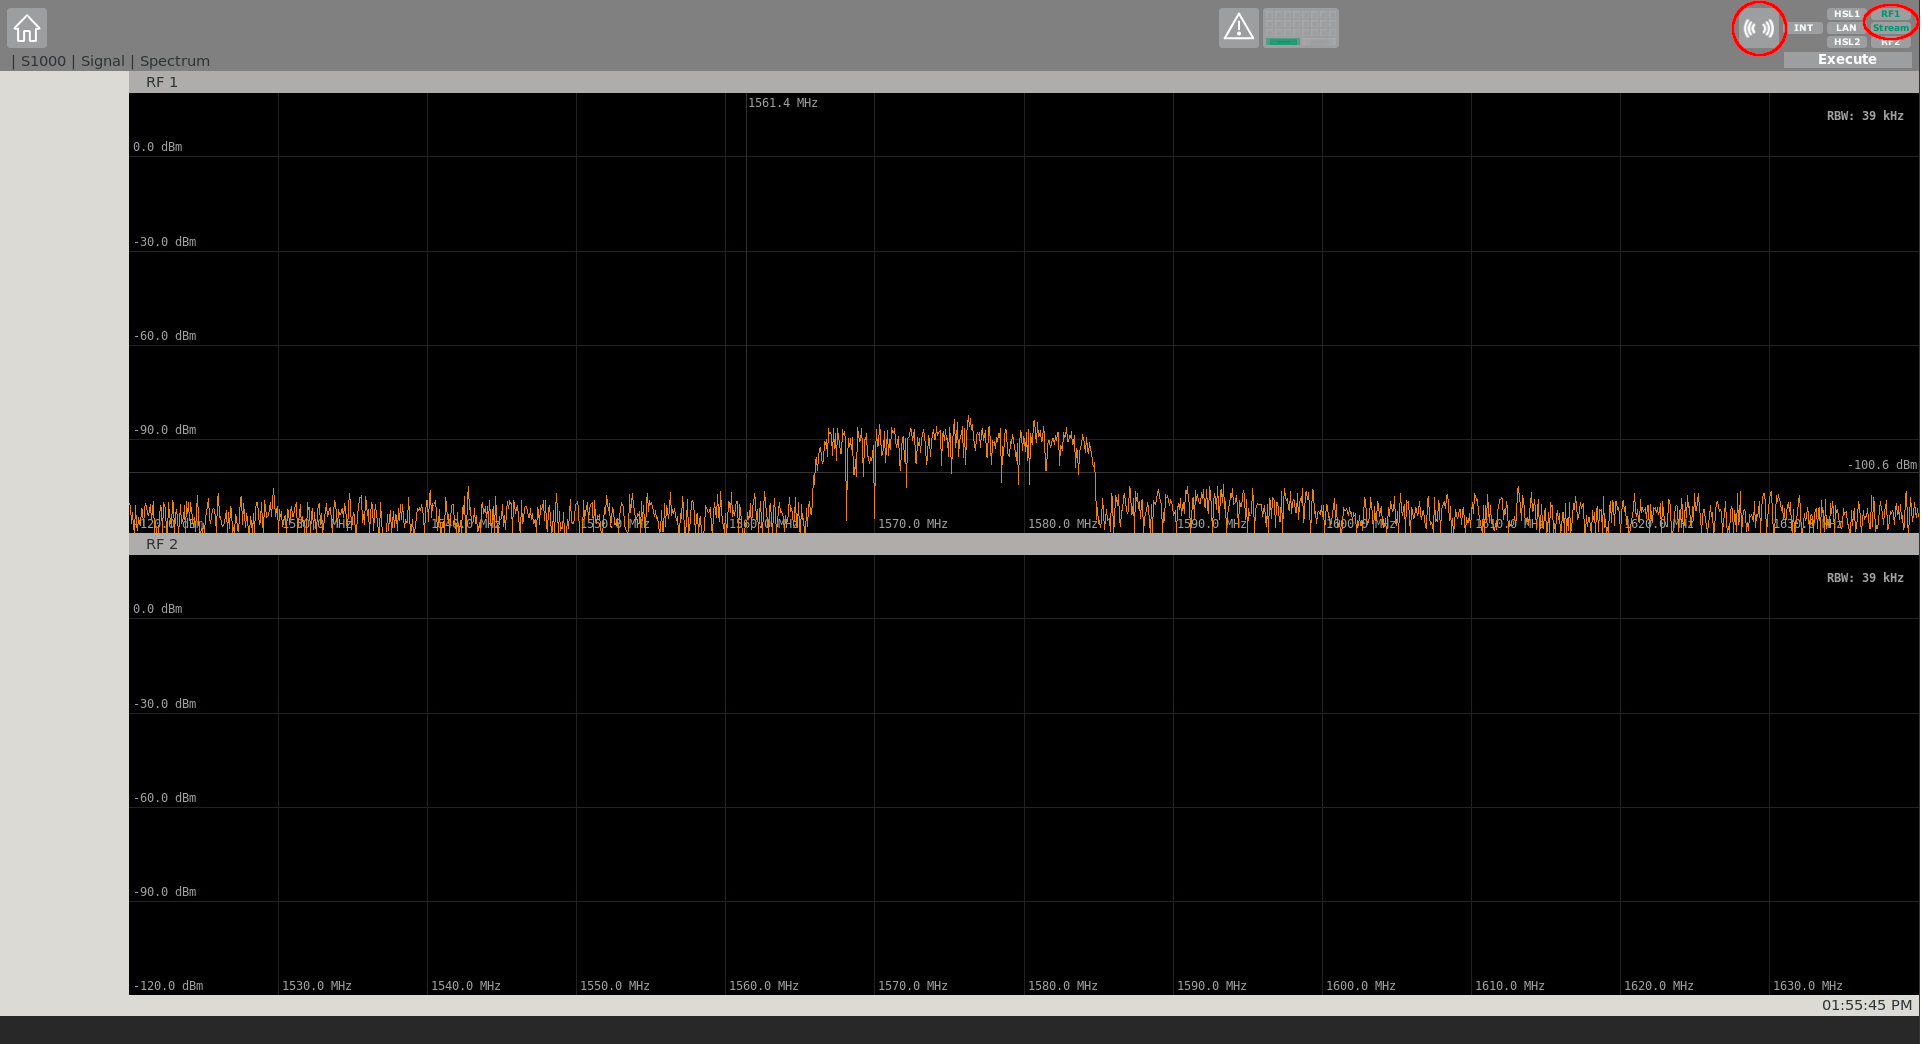
After applying all signal specific settings, the streaming of the IF file can be started. This is done, via the Stream button on the top right corner within the streaming toolbar. In order to stop the stream, the Stream button can be clicked again. By clicking at the frequency icon within the streaming toolbar, the frequency spectrum of the live stream can be displayed. Via the signal specific sub-page, the signal power can be changed during run-time of the stream.
NOTE
Make sure the appropriate RF channel is activated (green) too.
In the following, two examples are given for comparison purposes. Possible XPLORA scenario settings are given with their respective IZT S1000 GUI settings, to showcase a proper streaming configuration.
# Example Scenario 1: GPS L1 C/A & Galileo E1 OS on RF1
| XPLORA Scenario | |
|---|---|
| Sampling Rate | 10.23 MHz |
| Intermediate Frequency | 0.0 MHz |
| Output Configuration | 16 bit per Sample (signed) |
| ADC Quantization Levels | 65536 |
| Filename | scenario.json |
| Desired RF Output | RF1 |
| IZT S1000 GUI Settings | |
|---|---|
| Format | ARB 16Bit |
| Sampling Rate | 10.23 MHz |
| Filename | scenario_1_L1.bin |
| Skip and Duration | 0.0 s & -1.0 s |
| Streaming Time | Immediately |
| Source | Harddisk |
| Mode | On |
| Output | RF1 |
| Frequency Name | GNSS_L1 |
| Frequency | 1575.42 MHz |
| Power | -70.0 dBm |
# Example 2: GPS L1 C/A & Galileo E1 OS on RF2
| XPLORA Scenario | |
|---|---|
| Sampling Rate | 10.23 MHz |
| Intermediate Frequency | +0.5 MHz |
| Output Configuration | 16 bit per Sample (signed) |
| ADC Quantization Levels | 65536 |
| Filename | scenario.json |
| Desired RF Output | RF2 |
| IZT S1000 GUI Settings | |
|---|---|
| Format | ARB 16Bit |
| Sampling Rate | 10.23 MHz |
| Filename | scenario_1_L1.bin |
| Skip and Duration | 0.0 s & -1.0 s |
| Streaming Time | Immediately |
| Source | Harddisk |
| Mode | On |
| Output | RF2 |
| Frequency Name | - |
| Frequency | 1574.92 MHz |
| Power | -70.0 dBm |
# Pro Mode
In case Pro mode is used, GNSS signals are immediately upconverted to RF and replayed by the IZT S1000 hardware antenna channels RF1 and RF2. Therefore, this hardware is mandatory whe operating this mode. After the simulation is started, the S1000 GUI is automatically configured in the background by XPLORA via SCPI to meet the scenario settings. After this initialization phase is done, the actual streaming starts.
NOTE
Make sure the S1000 GUI is running in the background when using Pro mode.